Steps to setup FreePBX:
- Creating extensions (Applications->Extensions).
- Configuring the trunks for the SIP-provider (Connectivity->Trunks)
- Customize incoming calls to PBX (Inbound Routes).
- Customize outgoing calls from the PBX (Outbound Routes).
Creating extensions

Open "Applications-> Extensions". Select "Generic CHAN SIP Device" and press "Submit"

User Extension - extension number, which will be used to connect to PBX.
Display Name - the display name of the user for calls (in-net).
Secret - authorization password  of the extension
(password must be at least 6 characters and may consist of letters and numbers, it must have at least 2 digits and 4 letter or 4 digits and 2 letters).
After you have completed the fields save the changes by clicking "
Submit" at the bottom of the page and apply changes using "
Apply Config" at the top of the page.
Configuring the trunks of SIP-providers

Open "Connectivity-> Trunks" and choose "Add SIP (chan_sip) Trunk".
Sipnet.ru example:

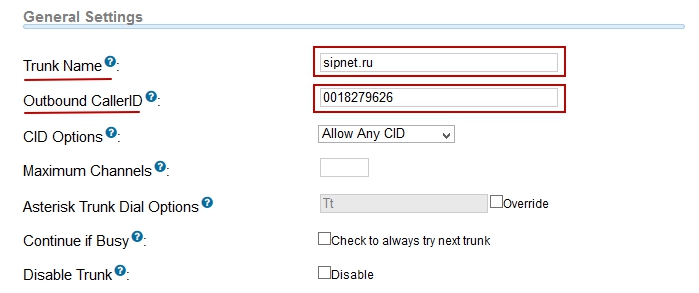
"General Settings":
Trunk Name: any name
Outbound CallerID: 0042145223 - (ID you received from your SIP provider)
"Dialed Number Manipulation Rules" set "match pattern" to ".", which means any number of digits in set of rules, so you can make calls to any phone number.

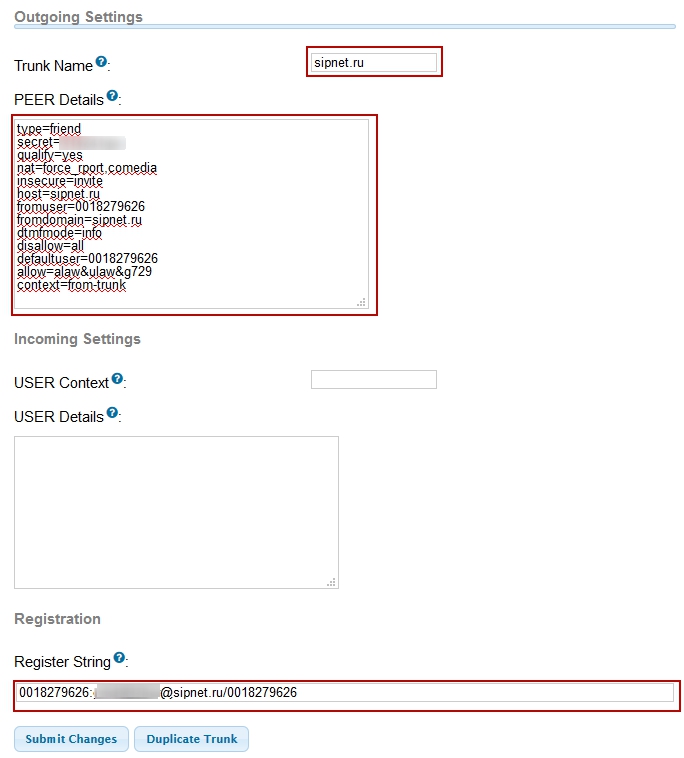
"Outgoing Settings"
"Trunk Name" - any name describing the trunk
"PEER Details" - in this field you need to set the following information to work with sipnet.ru. (These data and settings may differ depending on your SIP-provider.)
type=friend
secret=password
qualify=yes
nat=force_rport,comedia
insecure=invite
host=sipnet.ru
fromuser=your-sipid
fromdomain=sipnet.ru
dtmfmode=info
disallow=all
defaultuser=your-sipid
allow=alaw&ulaw&g729
context=from-trunk
"Incoming Settings"
"USER Details" (delete all rows from the field and leave it blank)
Setup incoming calls to PBX

Open "Connectivity-> Inbound Routes".
"Edit Incoming Route"
Description: (any description)
DID Number: specify the DID number (in this case the SIP ID - depending on the SIP-provider it may be different)
"Set Destination" select extension or any other suitable destination.
Press "Submit" button to save the data and then confirm the changes by pressing "Apply Config".
After that, all incoming calls from the "Sipnet" trunk will be automatically directed to the internal extension number we created in Extensions", which we use to connect to our PBX.
Setup outgoing calls from the PBX

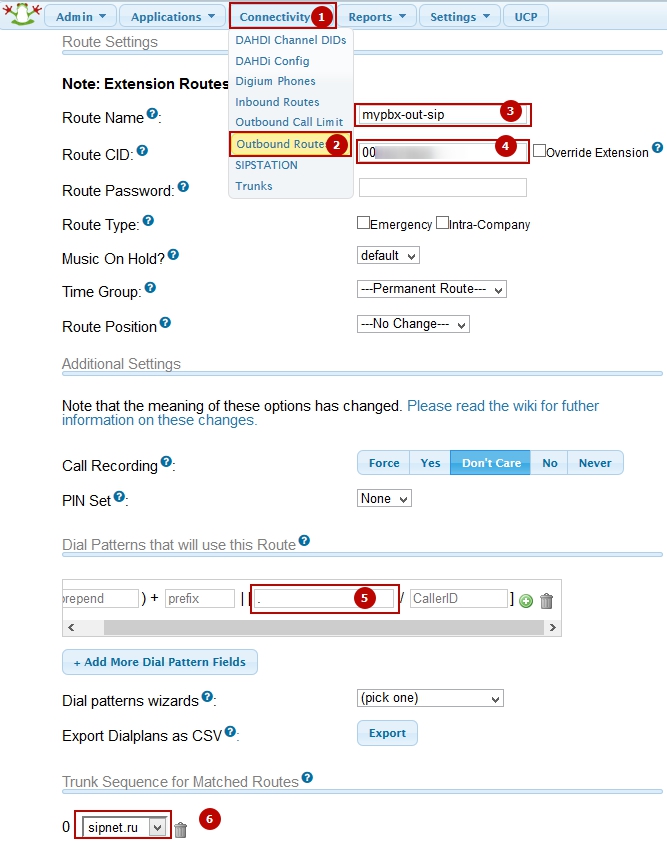
Open "Connectivity-> Outbound Route"
"Route Settings"
"Route Name:" (any name)
"Route CID:" specify SIP-ID (your ID from SIP-provider)
"
Dial Patterns" "match pattern" - set to ".", meaning to receive calls from any number containing any number of digits.
"Trunk Sequence for Matched Routes" select from the list of our previously created "Trunk" - sipnet.ru
Click "Submit changes" to apply the changes and click "Apply config".
After setup you can make calls use Virtual PBX.


